Tutorial I - Simple (using one stacked image)
Tutorial I - Simple (using one stacked image)
Task: Identify the image files involved where a moving object passes close to a field star so those images can be rejected in further processing.
Materials required:
- A set of individual images of a moving object to be stacked (48 images are used in this tutorial).
- A stack of all the available images, combined using the object's motion.
(Only the stacked image is needed for this tutorial)
Method:
Track & Stack a set of images using the object's motion with a program such as Astrometrica. The target object needs to be visible, but partially obscured by the trails of background stars or galaxies.
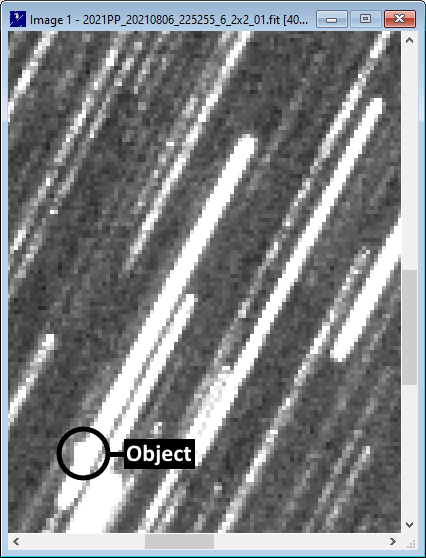
Here 48 images of fast moving minor planet 2021 PP have been stacked together using Astrometrica. The minor planet can be seen as a bump on the trail of a bright star:

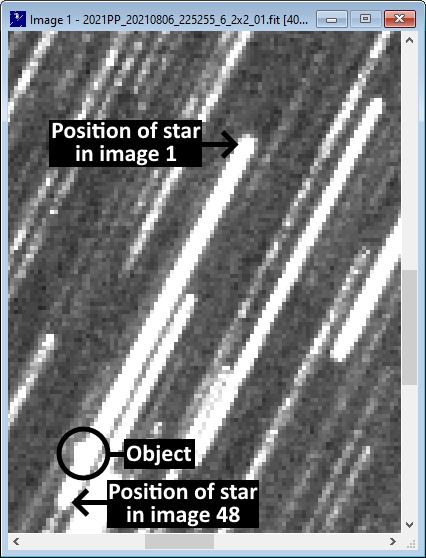
The minor planet was moving from bottom left to top right and the stacking process has compensated for that movement, keeping the minor planet in one place and causing the stars to appear as trails. With the minor planet held stationary, the position of the stars in the first image are at the top right of the corresponding trails and the position in the last image is at bottom left:

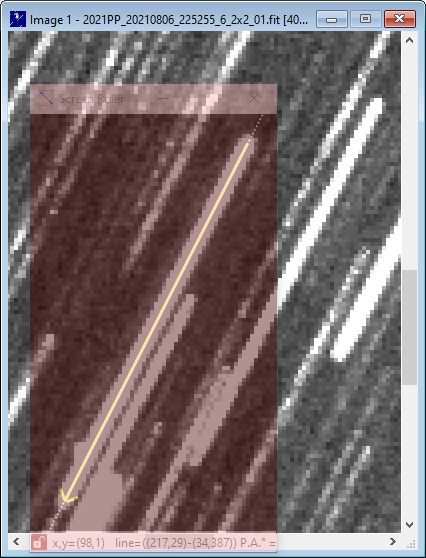
Start the Screen Ruler application then position the semi-transparent Screen Ruler window over the stacked image and resize to completely cover the star trail that is partially obscuring the minor planet..
Then use the mouse to drag a line on the Screen Ruler window from top right to bottom left along that star trail (hold the left hand mouse button down while moving the mouse).
As the Screen Ruler window is semi-transparent and easily overlooked, it is shaded red here for clarity:

The end of the line is marked with an arrow head. If the line has been drawn in the opposite direction, with the arrowhead pointing upwards then press the  Swap start and end coordinates button on the Screen Ruler Control window.
Enter the start and end image numbers in the Screen Ruler Control window (Start = 1, End = 48). Optionally also enter the start of exposure times for the first and last images (First = 22:52:55, Last = 22:58:56). Times can be entered with or without the colon ":" separators:

Click the mouse onto the Screen Ruler window so it regains focus. Move the mouse on either side of the bump on the star trail to display the range of image numbers likely to be obscuring the minor planet. If times have also been entered then the calculated time corresponding to the mouse position will also be shown:

Tip: Try this by entering the image numbers (and times) into the Screen Ruler Control window and position the Screen Ruler window over the image above, drag the ruler along the star trail, then use the mouse to read out the image numbers and times.
Images 40 to 44 are indicated to be close to the position of the minor planet, so the original images are now re-stacked, but this time leaving out images 40-44.
The result now clearly shows the minor planet but also reveals that another fainter star trail also passes through the image of the object:

Tutorial 2 covers the quick identification of ALL the field stars and galaxies that the moving object comes close to, rather than just the brightest.
Created with the Personal Edition of HelpNDoc: Free Web Help generator